
As previously mentioned, the whole re-build plan pretty much circles around the carbon dash, and getting the car “up to snuff” for it. I started laying out the plans for the PDM, and the wiring, and it’s been great fun embarking on a new skillset and puzzle.

The entire wiring for the car is now planned out in an excel spreadsheet. Every component is listed, and size/color/label of the wire. Where the wire comes from, where it goes, what terminal number on a connector it is (if appropriate), you name it. Along with the PDM I also ordered a pre-terminated motorsport harness, which essentially saves me from pinning each of the two 38-pin connectors. Here in Canada, the running joke is that whenever you buy a used car, you can pretty much guarantee 50% of it has been rewired (poorly) using exclusively red wire from Princess Auto or Harbour Freight. So the fact that my motorsport harness essentially uses only red wire, is pretty funny.

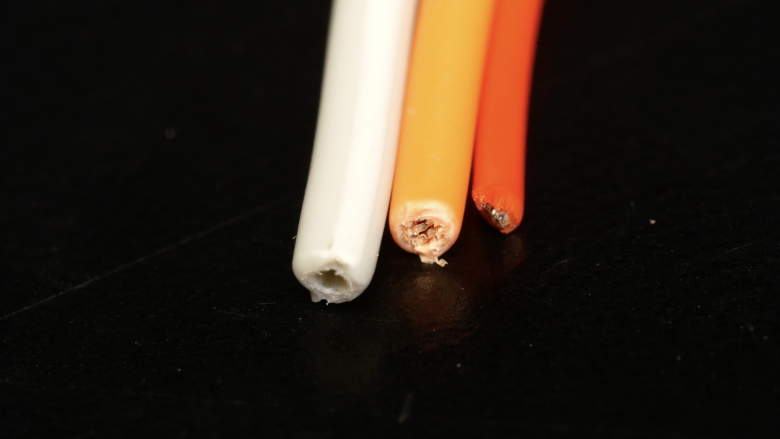
Since I had gone this far, I decided to go all the way. The original Rally Bug harness (that I built) was essentially built with PVC, or “auto hook up” wire. Where possible, I did use factory VW wiring, but there was a tonne of regular automotive wiring that went into the car, an example of which is pictured on the left wire in the image above. The motorsport harness I bought for the PDM is made up of Tefzel wiring, shown on the right, which has a significantly thinner insulating jacket. It’s more flexible, creates a smaller harness, and can handle temps up to 150c (vs 80c for PVC). Tefzel wiring, though, is not inexpensive. So for all the other wires I would need to add, I’ve used TXL wire, shown in the middle. It’s a thinner, more flexible wire than PVC, can handle up to 125c, and is a great middle ground and good “clubman” harness wire.
The purchase list extended to Deutsch connectors for everywhere, Kapton tape for the harnesses, and I’ve switched over to Raychem as a brand for all my heat-shrink.
August through October, essentially all I did was wiring. Every component has to go into the car, all the wires run, marked and taped, and then it all has to come out of the car to be wrapped, junctioned and covered. For the most part, every single wire has gone into, and out of, the car 4 to 5 times before it’s permanently located in the vehicle. Wire sizes, colours, lengths, etc. are all recorded into the wiring spreadsheet. This is also a great opportunity to test each wire and circuit before finishing the harness. A step anyone wiser than me would do, but I hadn’t yet bought the laptop appropriate for the PDM, or started programming it!


Anytime I’ve needed to do a wire splice, it’s done with a proper open-barrel splice and the appropriate tool which makes the “W” crimp we’re familiar with from the factory. Waterproof raychem heat shrink is used, and wires are labeled with their circuit using heat-shrink labels, and covered with clear heat shrink so the labels don’t rub off. In some ways, it’s ridiculously wasteful since many of the these labels end up underneath wiring sheathing and will never be seen. But as you’re building and routing the harness, it eliminates hours of head scratching or confusion.

Eventually I will have two main harnesses. One running up (inside) the passenger side heater channel, and one running up the inside of the driver’s side heater channel.

Any masking tape is used just temporarily, and gets replaced with Kapton tape. It’s thin, lightweight, and electrically neutral. Final heat shrink, labels and connectors are added (often after the harness is in the car.)


At times it looks like a complete disaster…

And then it starts to clean up.


The 3D printer was used to build things like switch panels and towers, and the shift rod was upgraded to a carbon tube.

Interior getting closer.
