
|
|
#106
 December 5th 2011, 05:00
|
|||
|
|||
|
Wow, very quick progress. Looking very nice!

|
|
#107
December 5th 2011, 13:43
|
||||
|
||||
|
Coming on nicely!
As for your coilovers, it looks like you have used 2.25" springs rather than the 1.9" which is why you are having problems...
__________________
http://www.ricola.co.uk Last edited by ricola; December 6th 2011 at 13:44.
|
|
#108
December 5th 2011, 15:02
|
||||
|
||||
|
Ahh, interesting.
These are the DS-402, which replace the 4855__ that everyone else on here has used so far. The actual shock body is 2" O.D., so there is no way a 1.9" spring is going to work! I could squeeze a 2.25" spring if I lathe down the various components...but at this point I think I'm better of welding away on my trailing arms so that I can use the shocks as is. ...but thank you. Knowing makes me feel a whole lot better. I was beginning to think I had lost it completely! -Dave
__________________
'71 Type 1 - Rally Project '58 Type 1 - I bought an early!?! '73 Type 1 - Proper Germanlook project '68 Type 1 - Interm German 'look' project '75 Type 1 - Family Heirloom '93 Chevy 3500 pickup - Cummins Swap
|
|
#109
December 6th 2011, 13:28
|
||||
|
||||
|
It is starting to look like a car again. Nice work.
__________________
NO_H2O 72 1302 Smack Black GL 73 Bus (2L CIS Powered) 66 Beetle, 73 Standard Beetle 72 Pinzgauer 710M Volksport Kafer Gruppe
|
|
#110
December 6th 2011, 15:08
|
||||
|
||||
|
Yup! I actually enjoyed a coffee in the garage the other day, just walking around and looking at the body/paint job.
Didn't get much done on the car yesterday, was working later then normal and then off doing some coaching work. Instead of some garage time I put in an hour on the decals I'll need for the car. Doesn't look like much for an hours worth of work, but by the time you sort out the files, and do the layers it takes a while! Finally figured out the roof decal, it's the old Raiffeisen Bank logo. Ran out of vinyl before I could do the stripe or the windshield decal. I'm considering paying a shop to do the stripes, just because they're so hard to lay straight on a curved body surface. 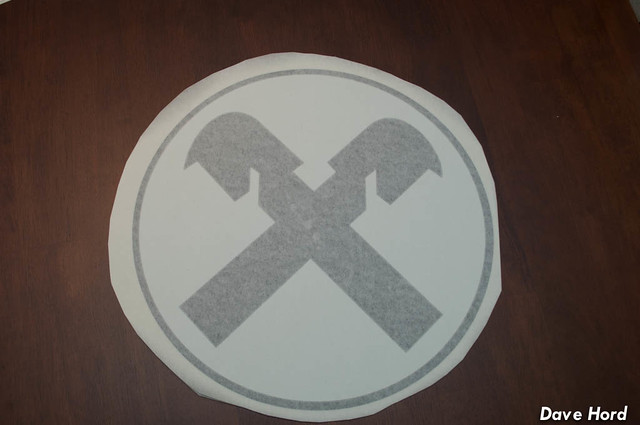 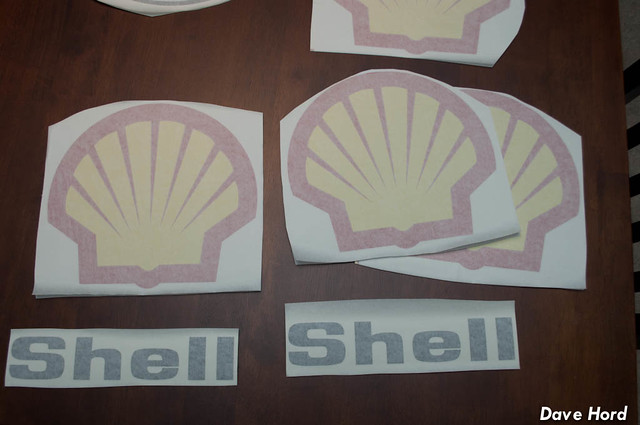 -Dave
__________________
'71 Type 1 - Rally Project '58 Type 1 - I bought an early!?! '73 Type 1 - Proper Germanlook project '68 Type 1 - Interm German 'look' project '75 Type 1 - Family Heirloom '93 Chevy 3500 pickup - Cummins Swap
|
|
#111
December 8th 2011, 04:06
|
||||
|
||||
|
...well, after two late evenings at work, I got back to the bug tonight. There is some positive news...the car is no longer resting on top of the sawhorses with the pan below...but instead resting on axle stands, mostly bolted to the pan:
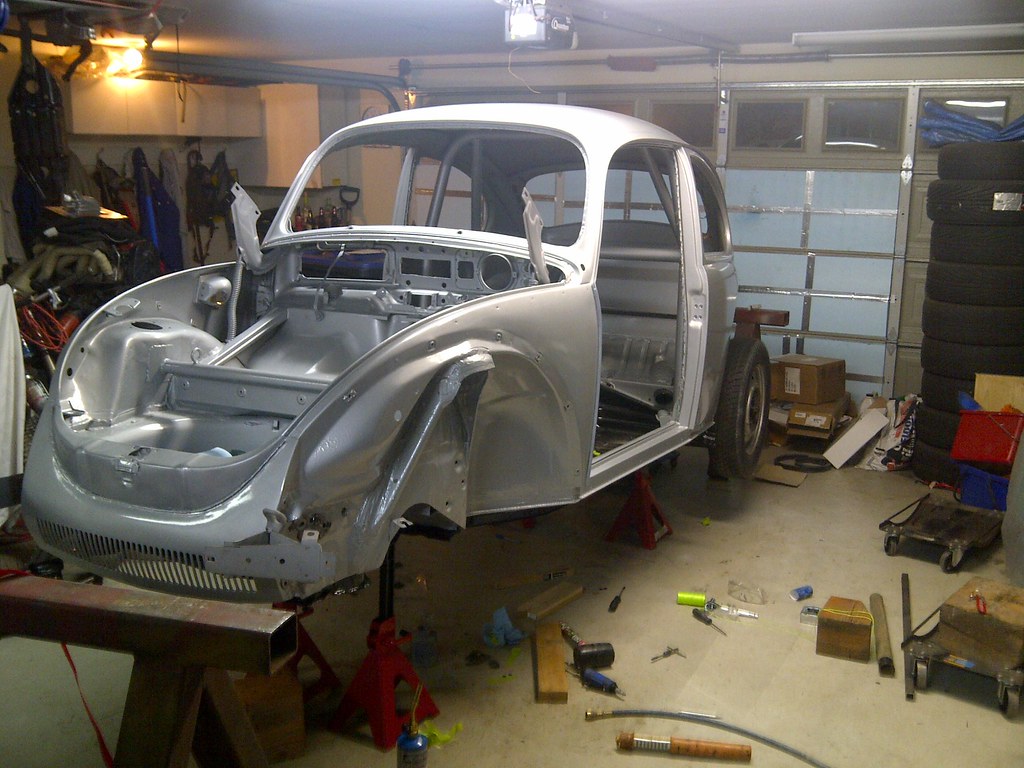 The problem, and one I wouldn't suggest any of you repeat, is this particular body and pan combination are meeting for the first time. First time? Yes, really. And yes, that's after paint! :-) Due to the way the project progressed I haven't actually had an opportunity to have this particular pan and body together in the same room. To make a long story short, they have both been bolted to a different body or pan...and THOSE two were bolted together at one point. So if A and B fit, and B and C fit...then A should fit C? Nope! Front bolts up no problem, four frame head bolts and the four bolts in the front of the heater channels. Under the rear seat 3 of four bolts are no problem. Passenger side heater channel, no problem. Driver's side heater channel...no dice. Now, I know normally one might need to pull out the die grinder and adjust things an 1/8 to 1/4 of an inch, but in this case my d-side heater channel is almost 1/2" too wide at the rear corner. Hmmmm. As the night progressed I was able to massage 4 of the 9 heater channel bolts in, with #5 just about ready to go. The die grinder on a bare pan/body isn't exactly quiet so I figured I should stop before the neighbours complain. The last three bolts (moving rearward) are going to be the tough ones. Might be pulling the body off to put some new inserts in. -Dave
__________________
'71 Type 1 - Rally Project '58 Type 1 - I bought an early!?! '73 Type 1 - Proper Germanlook project '68 Type 1 - Interm German 'look' project '75 Type 1 - Family Heirloom '93 Chevy 3500 pickup - Cummins Swap
|
|
#112
December 8th 2011, 05:20
|
|||
|
|||
|
Still everything else was going so well something had to hold you up right?!
Going to be all worth the hassle 
|
|
#113
December 9th 2011, 02:21
|
||||
|
||||
|
Whew! Bolted up! Don't ask how...it involved a few non-vw tools...but I've got it.
...cleaned up the shop, and tomorrow I'll start on a new project. Either mounting up the front suspension, or cutting into that fresh paint for a gas heater :P -Dave
__________________
'71 Type 1 - Rally Project '58 Type 1 - I bought an early!?! '73 Type 1 - Proper Germanlook project '68 Type 1 - Interm German 'look' project '75 Type 1 - Family Heirloom '93 Chevy 3500 pickup - Cummins Swap
|
|
#115
December 9th 2011, 15:38
|
||||
|
||||
|
Hi Clive,
My car is definitely not a true replica, and more of a 'tribute'. I intend to have the exterior as close to a replica as possible, and everything under the skin will be improved or modified to my personal tastes. Factory drivers, for instance, complained that the rear drum brakes weren't strong enough. I had always planned from day one to run 4-wheel discs. I'm building the car for TSD, Drivex, Rally-cross and Ice-cross racing. Here in Canada the stage-rally scene consists only of our National Championship and three regional rallies. Historic, for the most part, is non-existent and certainly not it's "own class". At times some of the drivers have created their own historic championship, but it's not a long-term viable effort right now. I was more intrigued by the fact that I could build a unique bug, based on a real 'factory' program that is essentially unheard of here in North America. There are very few people I've talked to who were even aware of the Salzburg cars...and most of them are Europeans who moved here! Were I living in the UK, I'd be building it to proper historic specs since there's actually opportunity to race it as such. -Dave
__________________
'71 Type 1 - Rally Project '58 Type 1 - I bought an early!?! '73 Type 1 - Proper Germanlook project '68 Type 1 - Interm German 'look' project '75 Type 1 - Family Heirloom '93 Chevy 3500 pickup - Cummins Swap
|
|
#116
December 10th 2011, 16:24
|
||||
|
||||
|
Getting pan and body together is sometimes a PITA. Start as many bolts as you can and shake/push the body around, start another and shake, then another and shake/push, etc. Then tighten the bolts.
Nice to see it together.
__________________
NO_H2O 72 1302 Smack Black GL 73 Bus (2L CIS Powered) 66 Beetle, 73 Standard Beetle 72 Pinzgauer 710M Volksport Kafer Gruppe
|
|
#117
December 12th 2011, 03:13
|
||||
|
||||
|
hahaha...I think this might be the longest I've gone without an update. Three whole days :P
Friday and Saturday were basically spent prepping items for installation. Painting parts, finding baggies of nuts and bolts...basically boring tasks in the garage which must be completed. But boring tasks lead to quite productive Sundays...so here we go: 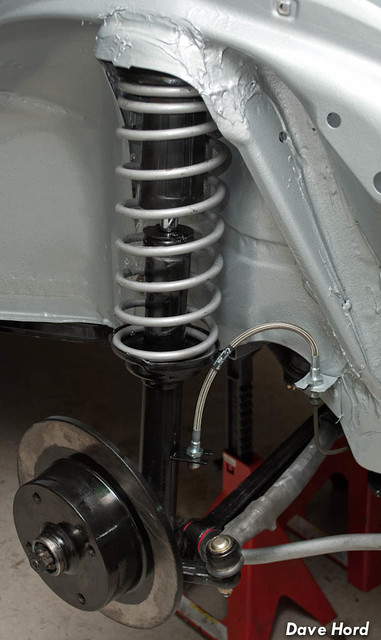 Front suspension, steering box, tie-rods and related kit are all in the car. Also finished up the brake lines, brake master and various grommets. If I had the front calipers (which I sold with the '69) the brakes would probably be bled and ready to go. I must say mounting up all the suspension pieces from new is a fun "which goes first" puzzle, the sway-bar to control-arm nuts being the toughest of the bunch. It was all relatively smooth, just had to come up with a good method for compressing brand new urethane bushings! One thing I'm not too stoked on is the upper strut mounts I've got. The left-side bushing is sitting all the way forward while the right-side sits center-outside. The old factory VW mounts sat perfectly centered, so it's a case of aftermarket replacement units just not being made as well. These ones do have a sealed bearing though...so you win some while you lose some. 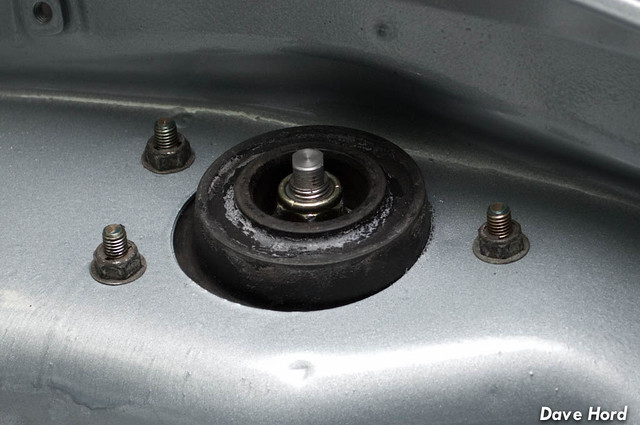 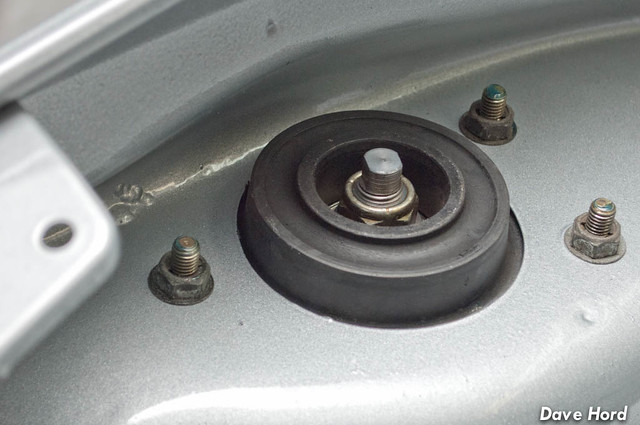 I have marked out the car for the gas heater. I've got to cut holes for the intake, exhaust and cabin ducting. The VW Eberspacher installation book includes the templates required, which I've printed out and confirmed to be dimensionally identical to what the book says they should be. As you can see, however, the template doesn't exactly "line up" with holes. Its supposed to be used on a "built car" (dealer install), but that shouldn't change anything that I can think of. There is a *bit* of wiggle room in the brackets, but not much. Haven't cut any holes yet...not until I know I can get it right.  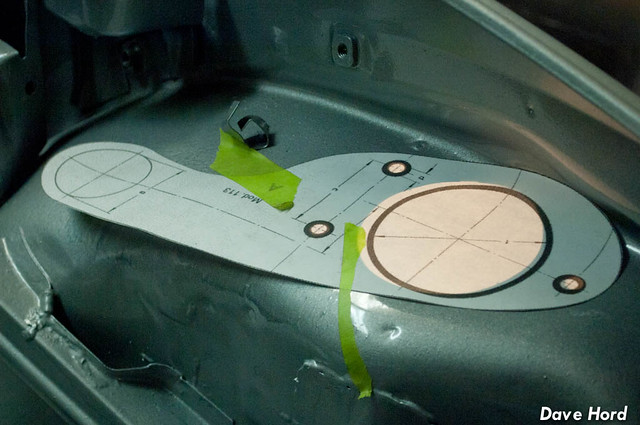 I also managed to get the pedal cluster installed, as well as the heating controls for the standard heater boxes. I've got the shortest VW clutch cable in the car now, and based on the length I think this one might work for me. Will need to setup the clutch fork and adapter tomorrow to see.    ...and finally, proving that I'm probably going a bit insane...I went around the car and painted all the bolt heads which weren't acid-dipped and painted before assembly. Can't have rusty items showing through on a perfectly new paint job! 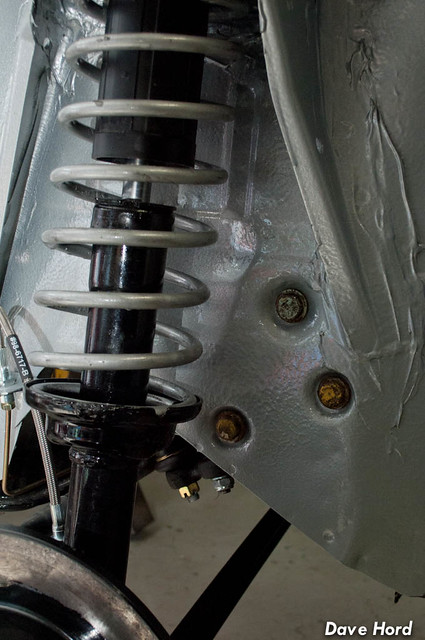 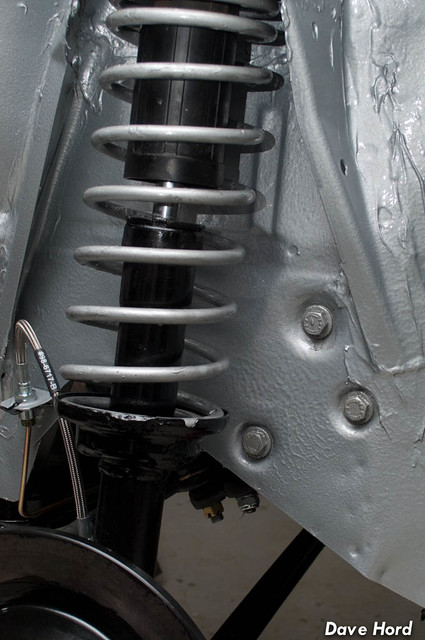 Pretty rad that if I needed to I could bolt on the wheels and roll the car around! Next up is the gas heater cut-outs, steering column, and then the headliner. I'm going to give a one-piece headliner install a shot myself. I figure the Porsche trans internals scared me before I opened it...and it wasn't bad. How terrible could a headliner job really be!?! Worst case, I do a horrible job and waste the cost of a one-piece headliner. Best case I end up with something passable for now :P But at this point I don't have the budget to pay someone to do it. So rather then hold things up for the sake of headliner, I figure it's worth the chance.  -Dave
__________________
'71 Type 1 - Rally Project '58 Type 1 - I bought an early!?! '73 Type 1 - Proper Germanlook project '68 Type 1 - Interm German 'look' project '75 Type 1 - Family Heirloom '93 Chevy 3500 pickup - Cummins Swap
|
|
#118
December 12th 2011, 08:32
|
||||
|
||||
|
Quote:
In a 'normal' Macpherson strut competition car the anti-dive is dialled in by dropping the pivot points for the anti-roll bar (vulnerably) lower but using a compression strut the rear pivot is raised keeping everything out of harms way. As you know anti-dive is worthwhile in loose stage cars as it stops the nose diving into the dirt and upsetting the suspension angles particularly the camber, which is the weakness of the strut suspension. The camber goes very negative under dive and you lose grip. Just a thought. Clive
|
|
#119
December 13th 2011, 02:37
|
||||
|
||||
|
Clive,
To be honest I didn't really think that I'd have any options. Do you have more details about using compression struts? Haven't heard of that one before, so definitely curious. ---------- Doesn't look like I got much done tonight...but cutting holes for the gas heater isn't something you rush! The exhaust and heater outlet holes are cut, but I didn't realize I don't have the correct sized hole saw for doing the heater intake hole. Will have to work that out later this week.   Originally I planned on installing the steering column as well, but one look at it's less-then-perfect finish, and I knew I couldn't do it. So stripped it down and it's currently drying. Will be a few days until I can get back to the car unfortunately. -Dave
__________________
'71 Type 1 - Rally Project '58 Type 1 - I bought an early!?! '73 Type 1 - Proper Germanlook project '68 Type 1 - Interm German 'look' project '75 Type 1 - Family Heirloom '93 Chevy 3500 pickup - Cummins Swap
|
|
#120
December 13th 2011, 07:27
|
||||
|
||||
|
Dave,
Have a look at the 2nd photo down: http://www.jemsracing.co.uk/cs_widetrack.html The photo is of an Escort racer taken from the underside but shows the normal TCA at 90* to the frame but there is a strut going from the outer end of the TCA at an angle back to the frame - this is the compression strut. Its adjustable for length that allows the caster to be altered. On the Escort the inner pivot is fixed but I reckon that if the bracket is mounted vertically you could drill several holes to give the option of raising the pivot point that would result in anti-dive. The other thing to note is that the anti-roll bar is detached from the TCA and is operated by a link from the MacPherson strut itself meaning that there is plenty of potential for mounting the connection to the anti-roll bar anywhere along the trailing arm of the AR bar to increase the roll resistance. Doing all this means that the TCA itself can be made adjustable to change camber with the compression strut taking care of the caster, the whole unit being a fabricated wishbone. Clive
|
 |
| Currently Active Users Viewing This Thread: 1 (0 members and 1 guests) | |
|
|


 Linear Mode

