
|
|
#226
 February 27th 2012, 18:54
|
||||
|
||||
|
Oddly enough, nothing in the rule book about the oil system being in the car. The breather will be in the engine bay, I just haven't determined how I'm going to vent everything and where it will mount, which is why I haven't done anything with the breather setup yet.
Should I need to, I can simply flip the oil-filter mount to the other side of the firewall and run two more bulkhead fittings. Or encase it in a metal box...but for now it should do as is. -Dave
__________________
'71 Type 1 - Rally Project '58 Type 1 - I bought an early!?! '73 Type 1 - Proper Germanlook project '68 Type 1 - Interm German 'look' project '75 Type 1 - Family Heirloom '93 Chevy 3500 pickup - Cummins Swap 
|
|
#227
March 1st 2012, 01:40
|
||||
|
||||
|
Well, not a lot of work being done on the car this week. Had a bit of an accident on Sunday pulling the engine out of the car. As I was pulling it back to clear the transmission it started to slip off the jack, and I lunged forward to get it. Possibly saved the motor, but slammed my forehead into the back of the car. Still not sure what I hit. I remember cleaning the knocked-over brake fluid off the floor, but then I'm standing in my upstairs bathroom wiping the blood off my forehead. No idea how much time passed. I don't even remember writing the post above.
Will be taking at least another day off before I go back to it. -Dave
__________________
'71 Type 1 - Rally Project '58 Type 1 - I bought an early!?! '73 Type 1 - Proper Germanlook project '68 Type 1 - Interm German 'look' project '75 Type 1 - Family Heirloom '93 Chevy 3500 pickup - Cummins Swap
|
|
#228
March 1st 2012, 02:25
|
||||
|
||||
|
S***ty Deal dude... Hope ya feel better I'v been there Done that only from the DH bike tho
 I love coming from the gym tho and knowing there is going to be a Post by the time I get home... but just take her easy. Chris.
__________________
74 Std. GL 08 Vw rabbit 18 WR250R 07 Chevy 3500 Dually
|
|
#229
March 2nd 2012, 03:39
|
||||
|
||||
|
Haha, yeah my snowboard and mountain bike career haven't been kind to my brain...so I'm far more careful these days.
Was back to the garage for a bit this evening. Started off with a bit of painting.  Following that I moved onto a project which I started on Sunday, but didn't get the chance to complete. It began with some cutting carving of a fan shroud... 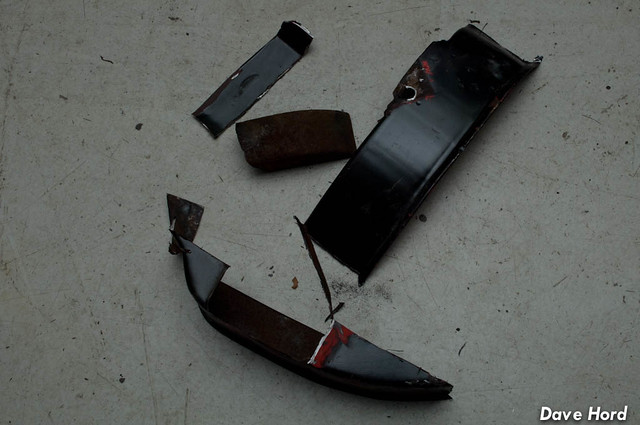 In hindsight, I wish I had started with a fan shroud that was in better shape. It wasn't until I removed all the paint that I discovered this one has more waves then the ocean during a tropical storm. From the get-go I figured it was a 'test piece' to figure out exactly how I wanted to do this...but in many ways it's ended up close enough to be useable, but just far enough gone that I don't think I can. The photographs I have from the original Salzburg cars shows that they were likely quick workshop jobs and not meticulously tig welded items of beauty. BUT, while mine may be appropriately 'period', it's not exactly matching of the rest of my work. 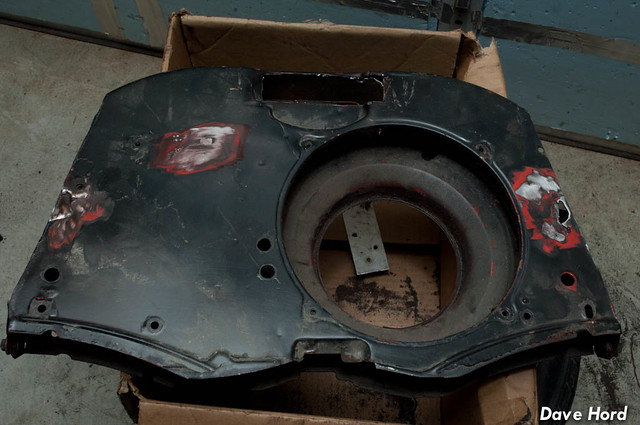 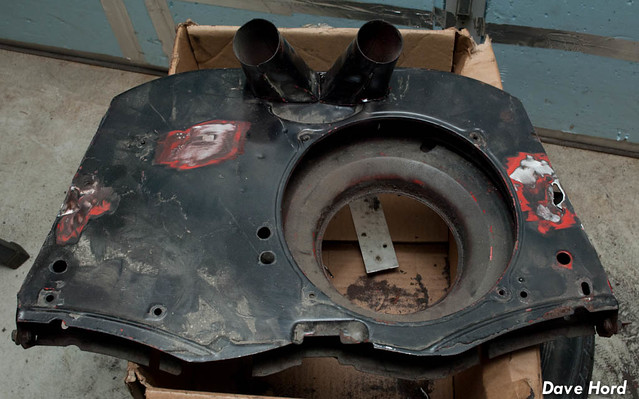 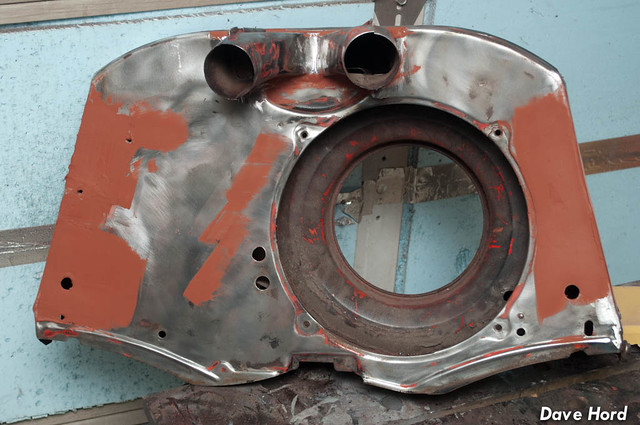 I'll cut the filler down tomorrow and give it a coat of primer to see how bad it really is. Maybe its useable...maybe it was a practice piece! -Dave
__________________
'71 Type 1 - Rally Project '58 Type 1 - I bought an early!?! '73 Type 1 - Proper Germanlook project '68 Type 1 - Interm German 'look' project '75 Type 1 - Family Heirloom '93 Chevy 3500 pickup - Cummins Swap
|
|
#230
March 2nd 2012, 04:57
|
|||
|
|||
 Good work. Really looking forward to seeing this finished. And glad to hear you are recovering too Good work. Really looking forward to seeing this finished. And glad to hear you are recovering too
|
|
#231
March 2nd 2012, 14:09
|
||||
|
||||
|
nice job on the fan housing - i recently saw an original salzburg rally beetle that is nearing the end of its resto - i wish i had taken pictures but if i had i dont think i would have left the premisis alive
 it really is great seeing these sorts of cars being built! it really is great seeing these sorts of cars being built!
|
|
#232
March 4th 2012, 04:36
|
||||
|
||||
|
Grrr! Photos would have been AWESOME!
Did another parts run yesterday, so today was a productive garage session. Started off with a relatively easy job, and popped the headlights into the car. I'm using an original Hella bucket on the one side, and mounting it took less then two minutes including polishing the headlight ring. On the other side, however, the original unit was far too rusty. I gather only the Taiwanese versions are available on their own. Now, in fairness I wanted to order something without lens/reflector/bulb since I already have H4 Eurolights...but had I ordered with these parts I could have got an original Hella part. But I went cheap...and wow is it cheap! The headlight is in, true, but if I need to change the bulb you have to pull the WHOLE bucket, not just the reflector/lens. 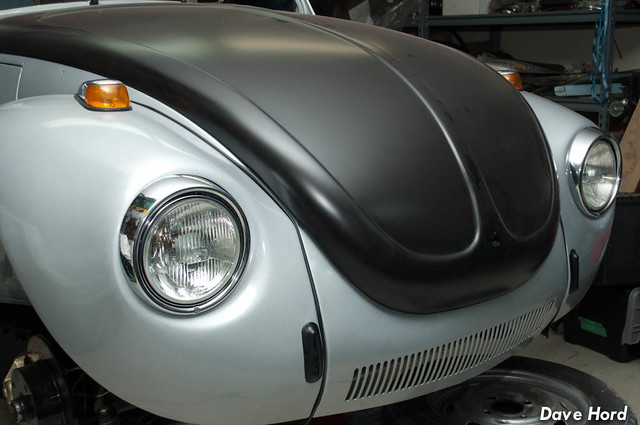 With the fan shroud in primer, the flaws become a lot clearer. Left side has a bunch of issues which are 300% better then they were..but still terrible. The right side, though, is where I created the disasters in metal (big holes). Thankfully its looking not too bad! 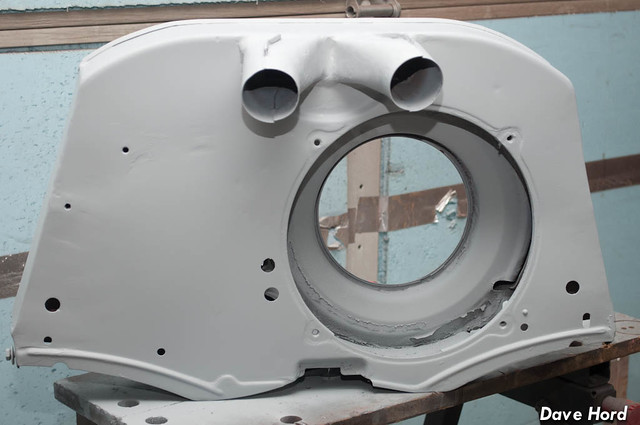 And a splash of red... 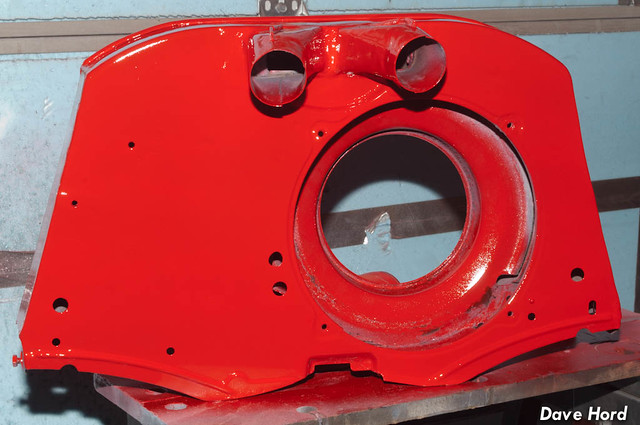  Of course, I got all the way to this point before I realized just how painfully obvious the left side weld is. Um, was I grinding with a concussion...how do you miss that!?! Sigh. I had a good idea for hiding/covering some of front issues...but that won't help here. 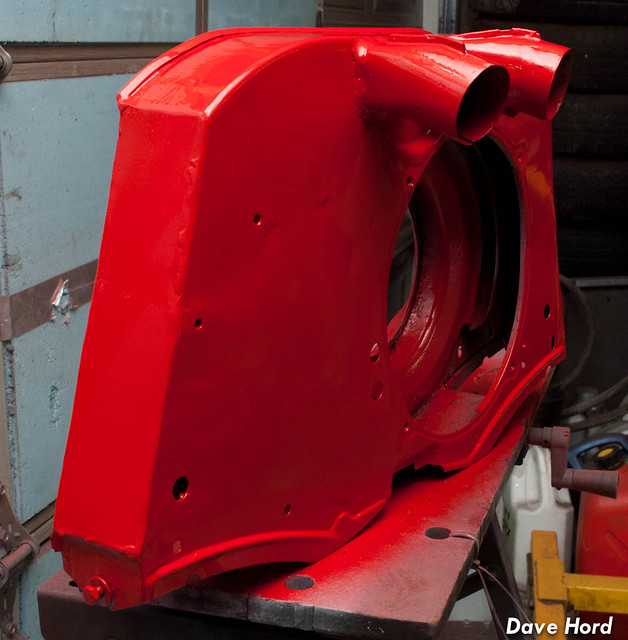 With the fan shroud drying, it was on to a more interesting custom project. A few weeks back a friend had mentioned that VW had a little-known accessory for protecting the inside of the rear fenders from gravel. Turns out one of the local Vancouver Guys, Bruce, owns a set and after a few emails back and forth they're now mine. The fender liners snap into the rear fenders, and are a little challenging to remove. This particular set is for an early car with the towel bumpers. The dark strips on both are from the tire spray, and the black marker marks are from where Bruce was going to need to cut them to fit a 73+ rear fender set. At first I was going to just going to snap them into my car, but I think the real value in these is the ability to use them as a pattern and not to destroy them with just one car. I also wanted to make a few changes to them, which would permanently wreck them...and, well, they're green. ;-)  So, I started to get my arts and crafts on with bristol board and some 1/8" LDHP plastic. I had the sheet left over from my last rally car project, so it was rather convenient! 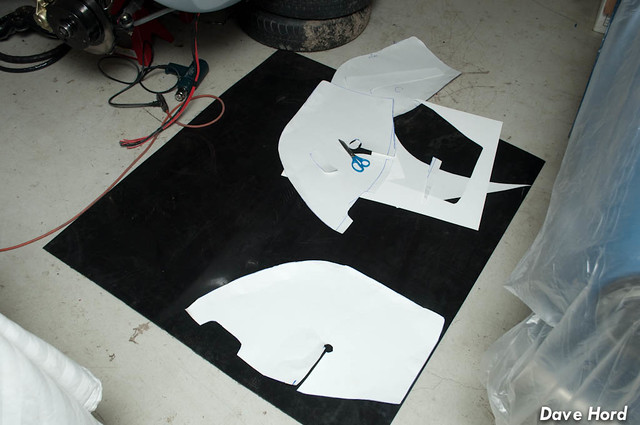 After a bit I had test pattern number one. The slot was my plan for installing it with the taillight wires already installed...but later decided it was just easier/cleaner to remove the wires and pop them back in. 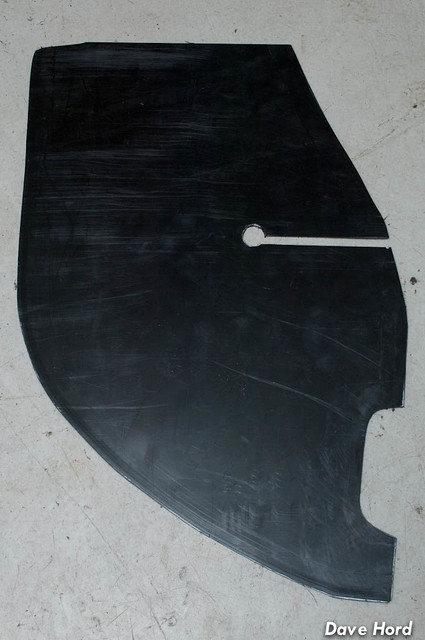 Pattern one test fit, you can see it's not pressed up tight against the fender at the top, which means it will be sucking in a lot of sand/gravel and road crap:  So made a few changes to make it sit tighter, added a couple of features, and the final piece is right here: 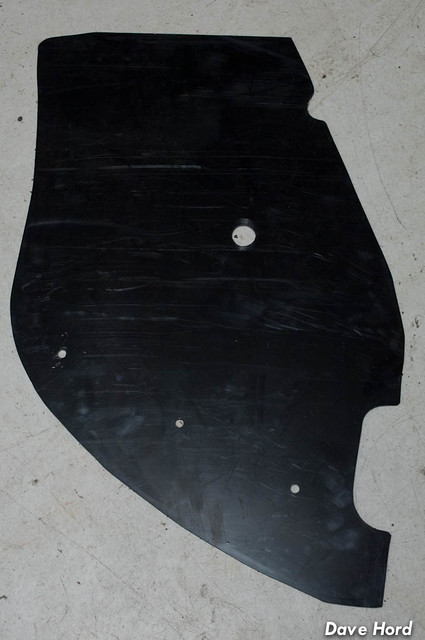 Inside the three holes I installed some bolts so that the ends are facing out towards the inside of the fender. I'm going to use these bolts to install short urethane mudflaps so that they hang down below the lip of the fender. That should protect the fender from the usual sandblasting that destroys the bottom lip. The final one I made here is tight...so tight it took me probably 10 minutes to wrestle it into the fender. I'm not sure I could get it out of the fender, but since it's finished I guess it doesn't matter...until I need to clean the crap out from behind it! Whoops! 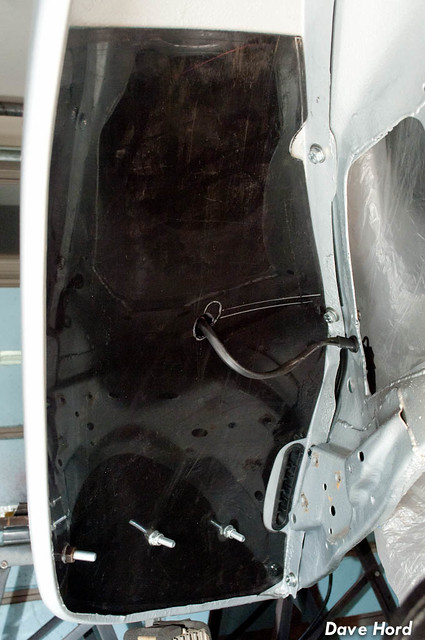 The driver's side has been made, I just have to pick up the hardware and pop it into the fender tomorrow. On Monday I'll pass by the rally shop and see if they have any sheet urethane -Dave
__________________
'71 Type 1 - Rally Project '58 Type 1 - I bought an early!?! '73 Type 1 - Proper Germanlook project '68 Type 1 - Interm German 'look' project '75 Type 1 - Family Heirloom '93 Chevy 3500 pickup - Cummins Swap
|
|
#233
March 4th 2012, 09:34
|
||||
|
||||
|
Good work.
I look forward to reading your [nearly] daily updates, also looking forward to seeing this finished. Your post's are keeping the website running. 
__________________
'72 Type 1 - GT '69 Type 2 - Bay
|
|
#235
March 4th 2012, 15:56
|
||||
|
||||
|
Quote:
 get some RED urethane for the Flaps...lol it will make it Bad@ss
__________________
74 Std. GL 08 Vw rabbit 18 WR250R 07 Chevy 3500 Dually
|
|
#236
March 5th 2012, 15:33
|
||||
|
||||
|
lol. I always thought it was Wally's thread that kept the site running! As for the Urethane colour, I was thinking black...but perhaps red will be the way to go. The rally shop is heavily subaru based, so hopefully they stock more then blue!
Didn't accomplish too much yesterday. I got the other fender liner in, but it doesn't fit as tightly as the first one. Can't decide if I should leave it removable for now or make another one that is so tight I can't remove it...  On the positive side of things when I determined the cause of my brake issues I ordered another master cylinder. When Rob at AVR inquired as to why I needed another one, he instantly offered a no-charge replacement. Didn't even want the old one back! I had painted the case with POR15, so I wasn't expecting a replacement, this was a nice bonus for sure! With the new master swapped over and a bleed done one-man, I already have more pedal then I did before. The pedal rod is adjusted correctly, as is the pedal stop, but I still have a fair bit of movement before any pedal pressure. Probably 2" worth. Will need to bed the pads in and two-man bleed it before I call them "okay". Finally got around to swapping the carbon fiber so it matches the shift knob... 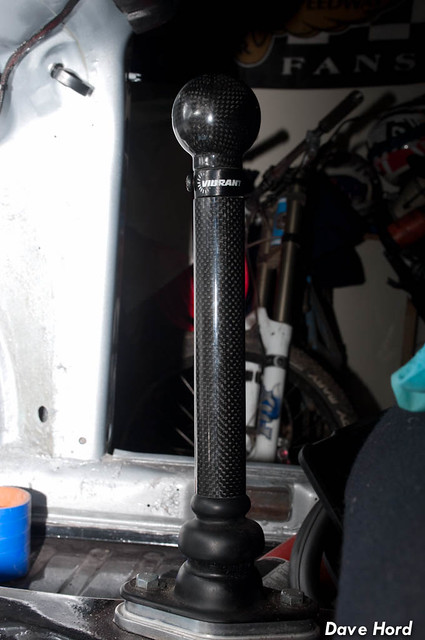 And cleaned up the shop a bit (for which you don't need photos :P) Tonight will be a night off, and then back at it on Tuesday. -Dave
__________________
'71 Type 1 - Rally Project '58 Type 1 - I bought an early!?! '73 Type 1 - Proper Germanlook project '68 Type 1 - Interm German 'look' project '75 Type 1 - Family Heirloom '93 Chevy 3500 pickup - Cummins Swap
|
|
#237
March 5th 2012, 17:58
|
||||
|
||||
|
With regard to the pedal slop, are you using a residual pressure valve on the rear circuit? It's something that i've recently found, that I'm hoping will solve some of my braking issues.
__________________
Lucy: 73 super beetle sport bug edition, 944 turbo suspension, 930 turbo brakes, 2165 FI, dry sump, turbo
|
|
#238
March 5th 2012, 18:34
|
||||
|
||||
|
No residual pressure valve. I'm using the same brakes front and rear, as I did on my '69. Same pedal cluster. The only thing different is the super beetle line routing, and the master. So if I didn't have a valve on my '69, I shouldn't need one here!
-Dave
__________________
'71 Type 1 - Rally Project '58 Type 1 - I bought an early!?! '73 Type 1 - Proper Germanlook project '68 Type 1 - Interm German 'look' project '75 Type 1 - Family Heirloom '93 Chevy 3500 pickup - Cummins Swap
|
|
#239
March 6th 2012, 12:55
|
||||
|
||||
|
We put 914 rear calipers on the rear of my friend's '69 ghia, they're fairly small so we didn't need a bias valve either.
__________________
'66 Bus(11-window, CLK rims, disk brakes, IRS, bags, hydr. clutch, Super-1600 w/injection)
|
|
#240
March 6th 2012, 22:28
|
||||
|
||||
|
dang, i love them inner fender guards. you would happen be opposed to send me a copy of a template so i can make my own would ya? by the way been watching your build...very stellar work!!!
|
 |
| Currently Active Users Viewing This Thread: 2 (0 members and 2 guests) | |
|
|


 Linear Mode

