
|
|
#481
 November 15th 2013, 10:19
|
|||
|
|||
|
hi Dave, Backtracking here because something dont add up with the engine failure, the clue is the seize (partial?) on no' 3 rod bearing and the seized no 1 main, that is down to low oil pressure, usually due to oil surge, i know you are dry sump, but it can still happen in the d/s tank, i think the other event with the flywheel coming loose?? may be a red herring, its definitely lost oil pressure and that is separate to the loose flywheel im sure. its important to isolate this earliest as it may carryover to the new engine.
 regards anyway. regards anyway.

|
|
#482
November 15th 2013, 18:53
|
||||
|
||||
|
Well, oil pressure never dipped on the gauge, but that's the other end of the engine case. Over-revved at the end of the drag strip for sure, which could be a culprit. Regardless, the new motor is slated to share no parts with the old motor, except for possibly the fan shroud and the tin. I was going to reuse the oil pump, but that hasn't been completely decided yet. The crank also hasn't been inspected for cracks or damage which could be related the oil pressure...I haven't even pulled the rods off it yet. There is some minor concern that an issue in the rest of the oil system could be at fault, but I'm planning on flushing and checking each line, as well as replacing the ones that come near the exhaust system (in case there is internal heat damage).
Gotta have some risk  -Dave
__________________
'71 Type 1 - Rally Project '58 Type 1 - I bought an early!?! '73 Type 1 - Proper Germanlook project '68 Type 1 - Interm German 'look' project '75 Type 1 - Family Heirloom '93 Chevy 3500 pickup - Cummins Swap
|
|
#483
December 16th 2013, 16:04
|
||||
|
||||
|
I've had some long time "off" of the garage, but puttered around a little bit. While flushing and checking hoses I've come to think that either the scavenge-to-tank or pressure-to-filter line may be disintegrating due to heat. After flushing the lines I found some two or three extremely small black specs, I would have passed them off as carbon but they don't break up or dissolve in carb cleaner. I wish I had done each line into it's own container, then I'd know which one the specs came from. I think the solution is pretty easy, however, as there are just three oil lines that come close to the exhaust. I'll swap those out with fresh, and upgrade the heat protection. Could be the reason for losing oil pressure on bearing #1, but it would have had to sneak its way around the oil filter. Odd, but sort of a non-issue at this stage...replace, replace, replace!
In the meantime, I started working on the shifter mounts... 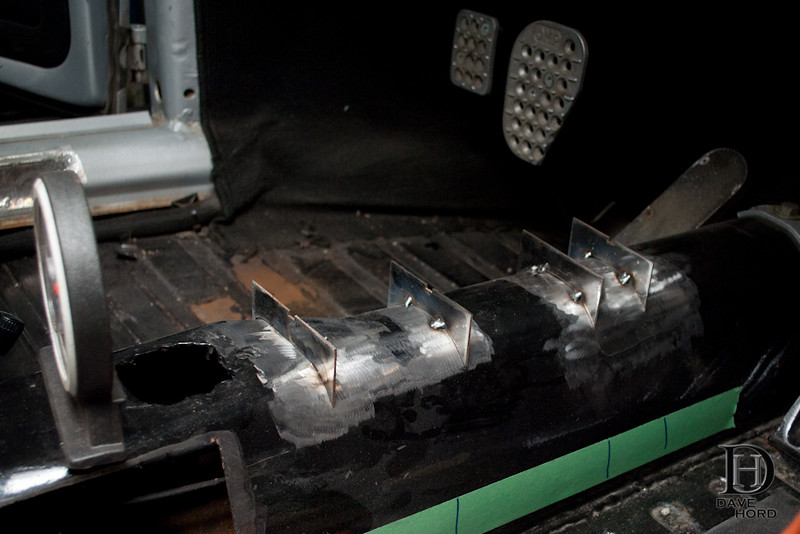 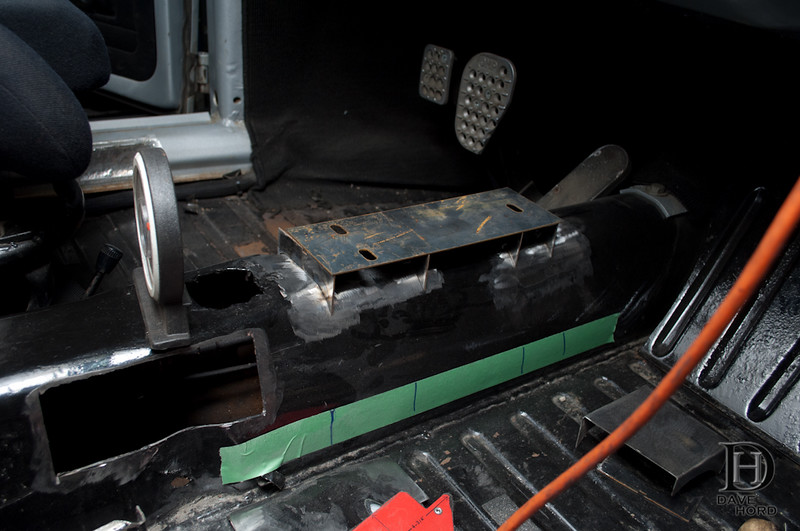 Bolted in. I need to make 'sides' which will bolt in separately. For now I have lots of measuring and math ahead of me, to ensure I put the hole for the shift rod in the right spot :P 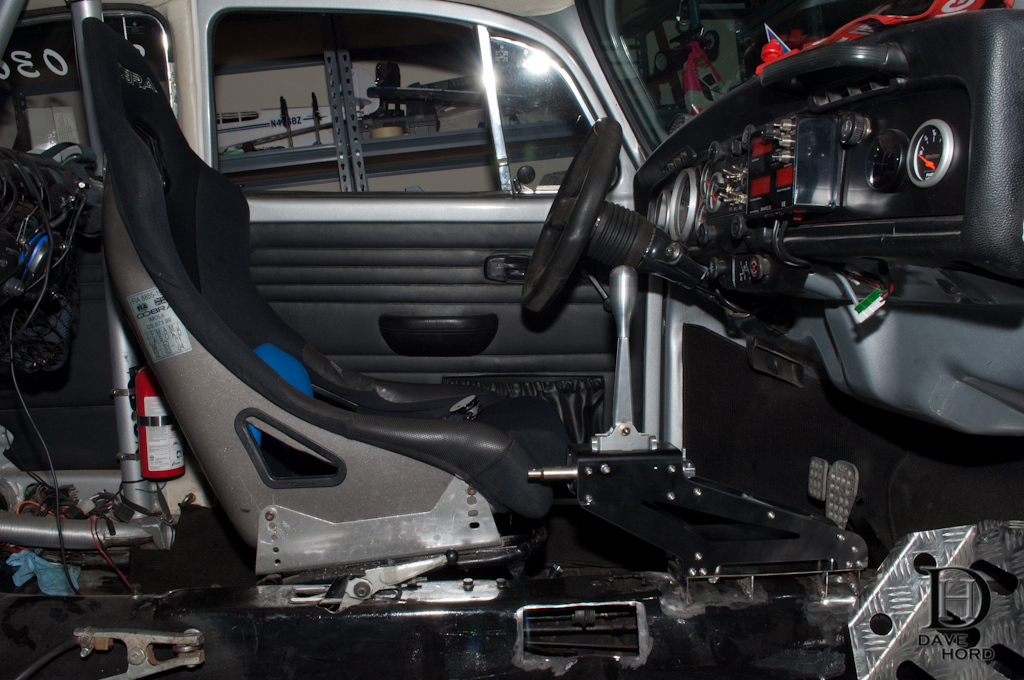  -Dave
__________________
'71 Type 1 - Rally Project '58 Type 1 - I bought an early!?! '73 Type 1 - Proper Germanlook project '68 Type 1 - Interm German 'look' project '75 Type 1 - Family Heirloom '93 Chevy 3500 pickup - Cummins Swap
|
|
#484
December 17th 2013, 04:21
|
||||
|
||||
|
Fit a hydraulic handbrake, it will help you a lot, trust me on this.
__________________
VW 1303s 1975 (German Look) VW 1300 1964 (Rally Car) LAND ROVER DEFENDER 90 V8 BMW E30 318i CONVERTIBLE 1992 Italian Toys - GERMAN WAR MACHINES  WRC is for boys - GROUP B WAS FOR MEN
|
|
#485
December 17th 2013, 14:48
|
||||
|
||||
|
Nice work, especially the last picture looks impressive!

__________________
Greetings! ________Gerrelt ________homepage:gerrelt.nl __________________________________
|
|
#486
December 17th 2013, 23:04
|
||||
|
||||
|
Quote:
-Dave
__________________
'71 Type 1 - Rally Project '58 Type 1 - I bought an early!?! '73 Type 1 - Proper Germanlook project '68 Type 1 - Interm German 'look' project '75 Type 1 - Family Heirloom '93 Chevy 3500 pickup - Cummins Swap
|
|
#487
January 22nd 2014, 16:32
|
||||
|
||||
|
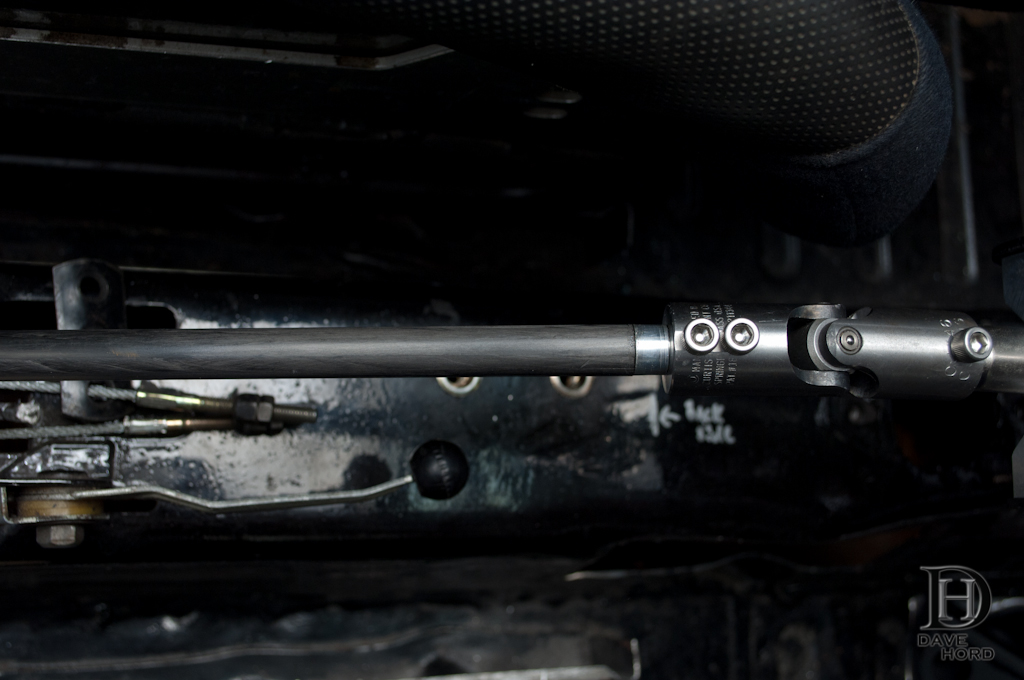
Shifter is now working through all gears. I'm waiting on the handbrake install, but once I take care of that I'll strip the interior and paint the tunnel and floorpans again. The throws are longer then I was expecting, but the shifting is unbelievably precise. Having the shifter so close to the steering wheel more then makes up for the throw length. I still have to adjust the side-to-side limits, but in order to do so I will need an engine and the chance to drive it. As a nod to the Germanlook forum I opted to pass on the standard steel shift rod, and instead made my own from Carbon fiber. It's lighter and stiffer, and an improvement if my aluminium ends bonded well enough!
  -Dave
__________________
'71 Type 1 - Rally Project '58 Type 1 - I bought an early!?! '73 Type 1 - Proper Germanlook project '68 Type 1 - Interm German 'look' project '75 Type 1 - Family Heirloom '93 Chevy 3500 pickup - Cummins Swap
|
|
#488
January 23rd 2014, 22:21
|
||||
|
||||
|
I love the CF, I just don't know if I would do it myself. After watching WRC for awhile and watching the drivers lose stages because they broke off their CF shifter handles that were works built, I tend to just go with slightly heavier stuff that would bend instead of breaking
 . .Jason
__________________
If I could just get paid for my sleepless nights.... 1960 VW Bug UBRDUB Walkaround 1st Drag Run Dyno Run Oval Ragster-'57 Rag/'04 Boxster S
|
|
#489
January 24th 2014, 04:22
|
||||
|
||||
|
haha, yeah I've definitely considered that. I was more curious if I could make one that would hold, so I figured it's worth a try. On the transmission end I've both bonded the aluminum and used a clamp externally. If it fails, I'm pretty sure it's going to fail at the shifter end. Will keep a metal rod in the car for the first little bit until I'm sure!
-Dave
__________________
'71 Type 1 - Rally Project '58 Type 1 - I bought an early!?! '73 Type 1 - Proper Germanlook project '68 Type 1 - Interm German 'look' project '75 Type 1 - Family Heirloom '93 Chevy 3500 pickup - Cummins Swap
|
|
#490
January 31st 2014, 18:16
|
||||
|
||||
|
Well, not a lot of progress to report. I've been working on my Coupe quattro Turbo project, so the bug has been hibernating. I am pleased to report that all the major engine components are in-house now, and going to my engine builder for machining & balancing. In the meantime, I've ordered 3 of these which should make engine pulls much more pleasant:
 -8AN dry fluid breaks for the oil lines. Will allow me to remove the engine without draining and disconnecting all the lines each time. -Dave
__________________
'71 Type 1 - Rally Project '58 Type 1 - I bought an early!?! '73 Type 1 - Proper Germanlook project '68 Type 1 - Interm German 'look' project '75 Type 1 - Family Heirloom '93 Chevy 3500 pickup - Cummins Swap
|
|
#491
February 3rd 2014, 10:08
|
||||
|
||||
|
Quote:
") Just kidding. Those are pretty neat looking fittings, I haven't seen those before. The only ones I've dealt with are having lines made with the slip-sleeve. How much do those cost? Just kidding. Those are pretty neat looking fittings, I haven't seen those before. The only ones I've dealt with are having lines made with the slip-sleeve. How much do those cost?
__________________
'66 Bus(11-window, CLK rims, disk brakes, IRS, bags, hydr. clutch, Super-1600 w/injection)
|
|
#492
February 3rd 2014, 14:06
|
||||
|
||||
|
Scared to type this...but roughly $80 per fitting.
-Dave
__________________
'71 Type 1 - Rally Project '58 Type 1 - I bought an early!?! '73 Type 1 - Proper Germanlook project '68 Type 1 - Interm German 'look' project '75 Type 1 - Family Heirloom '93 Chevy 3500 pickup - Cummins Swap
|
|
#493
February 5th 2014, 05:54
|
|||
|
|||
|
Youch, but worth it. The quick connects are used on air lines and I've often wondered why the cost is so much more for fluid lines
|
|
#494
February 21st 2014, 05:16
|
||||
|
||||
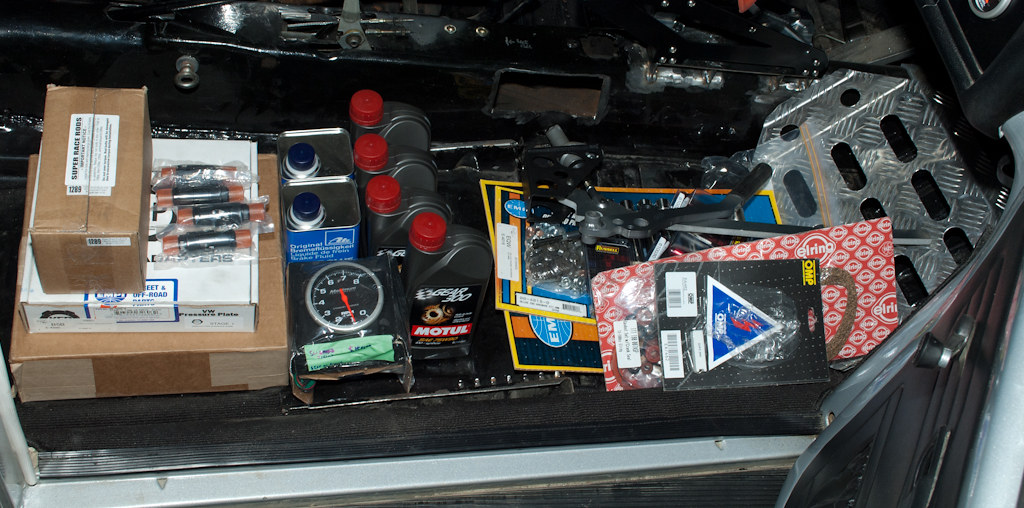 I’ve been spending most of my time lately working on the 1990 Coupe quattro project, but seeing as the pile of parts for the beetle is growing…I best start working on it again! Well, that and I’m sick of working on the Audi. 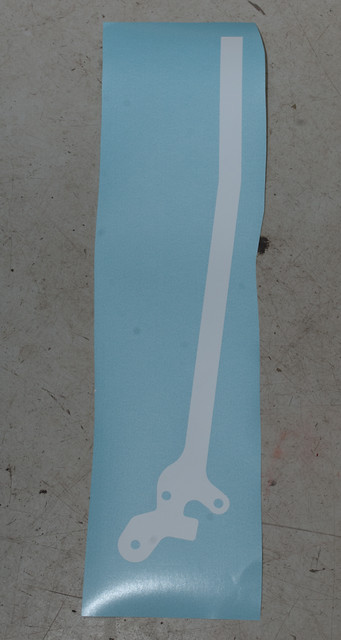 A while back I did the design for my vertical handbrake, or rather the ‘first’ design. I know I will need to drive around with it and refine it a bit before doing the finished version, so did a basic outline of the handle for now. The problem is, without being able to physically sit in the car with it, how do you know you’re “close”. It dawned on me, while cutting decals, that I have a relatively smart rapid prototype option right here at home. A quick true-size sticker, and some cardboard and… 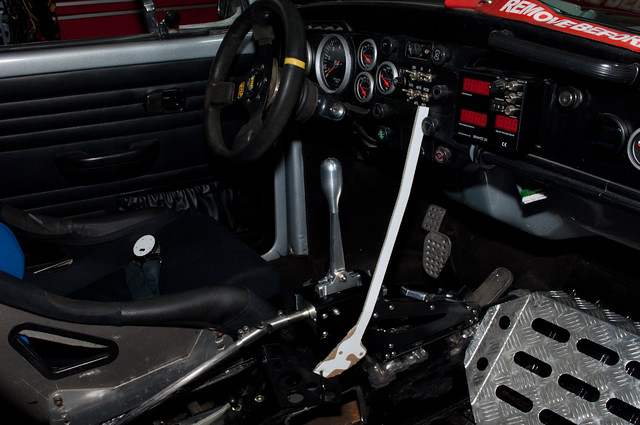 Voila! A test unit that can be tried out in the car. Without having the base mounted it was pretty tough to “try”, but at the very least I figured out I was close enough to send the drawing out for water jet cutting.  With a few additional bits stolen from a Rocket Rally horizontal handbrake, and a Honda clutch master cylinder, I have myself an inexpensive hydraulic handbrake to try out. The last step was to lathe up the pivot bushings, and drop the handle off with Nick at Rocket Rally for some TIG welding. As soon as I get it back, I can weld in some mounts on the transmission tunnel. 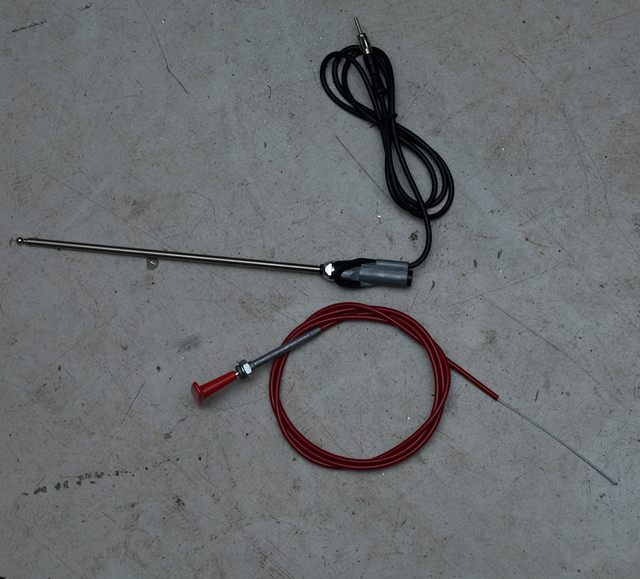 In the meantime, I’m trying to plug away on a number of the little jobs I never seem to do. I’ve had this idea in mind since before the car was finished, but never got around to it. No time like the present! 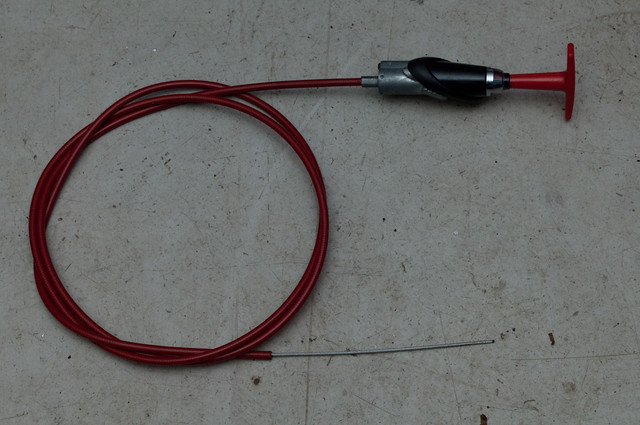 Pull cable and radio antenna, when combined, become an external battery-cut-off switch. Now, I suppose I should mention that when I bought the pull cable there were two options. This one, which is a shorter “front of the car” length cable, and the longer “back of the car” setup which I knew i would have to cut down quite substantially. I was prepared to buy the more expensive longer version, but the shop owner convinced me I was wasting money and this one was long enough. It’s not. Well, it is. But only for one cable routing option. It’s not long enough to try various options and ideas and then decide which one I like best. Mildly frustrating, but only because I will never know if this one “is” the best :P Still need to make a couple of bits for it, and then I’ll finish the install. 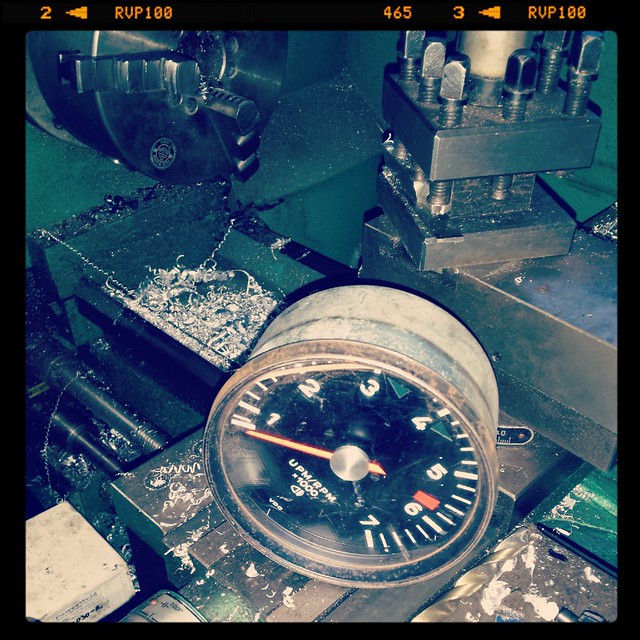 The Porsche tach, or rather the way the needle bounces on downshifts, has always bugged me. I have a 3 3/8” Stewart Warner tach doing nothing, so why not have a precise tach in my car? Well, the mounting of a small tach in a big hole is a problem. Last year I came up with a pretty good idea, and then crushed an old 914 housing in the lathe. Oops. I figured it was because I disassembled the tach and weakened the body too much. I recently found I have a plastic-faced 914 tach which has seen better days, so time to try again! 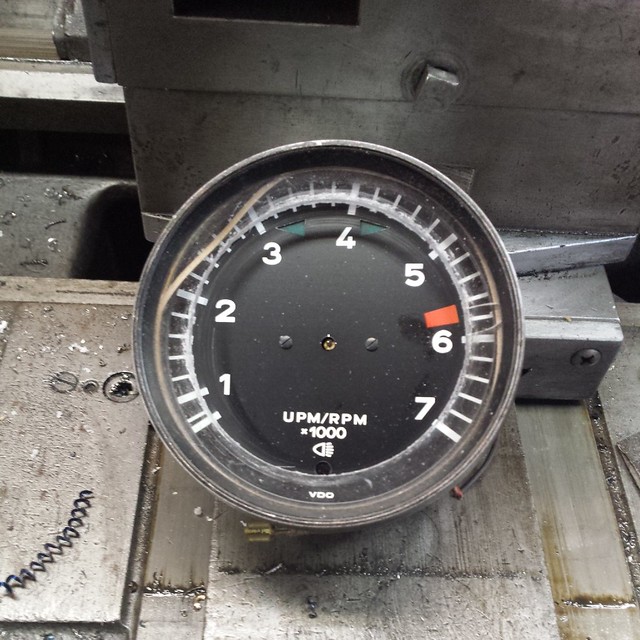 Step one seems to have gone fine. I now have hole perfectly sized for the SW tach, and keeping the Porsche unit assembled definitely makes it more rigid. Now I’ll just flip it over, and use the lathe to cut the back end off the tach…  Oops.  Well, lets just move onto other things then. Voltmeter replaced by cylinder head temperature, using a NOS VDO gauge I found at last weekend’s swap meet. Once I confirm it works, I’ll paint the outside rim silver, and touch up the panel behind it. Installing the gauge was a colourful language affair, since I had to run sensor wires all the way to the engine bay…frustrating when I know I have spares hidden in my wiring harness. Just can’t use them as the cylinder head gauge requires using their wires without cutting. Sigh. 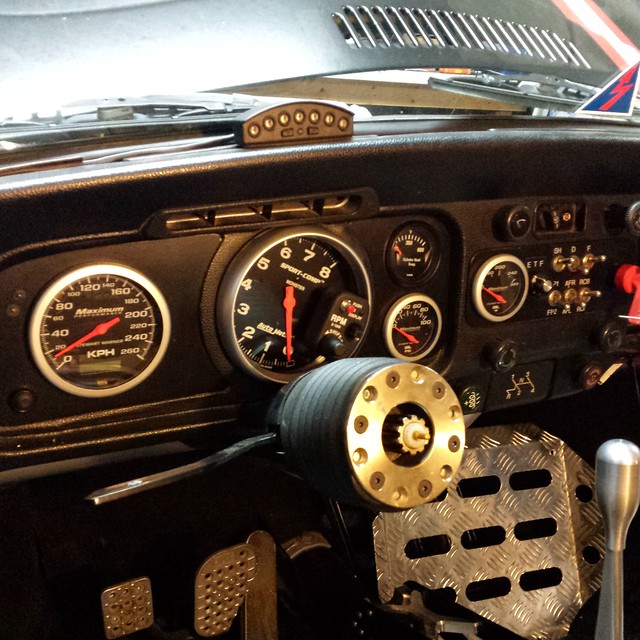 I did solve the tach problem though. Spent just a wee bit of money and dropped a 5” Monster tach into the dash. I’m planning on taking the car down to the VW Classic show in June, and figure this will buy me some street creed with the Cal-Look crowd. :-) But in all serious, it solved the problem was the closest match I could get to the current gauges and allows me to button the dash back up. 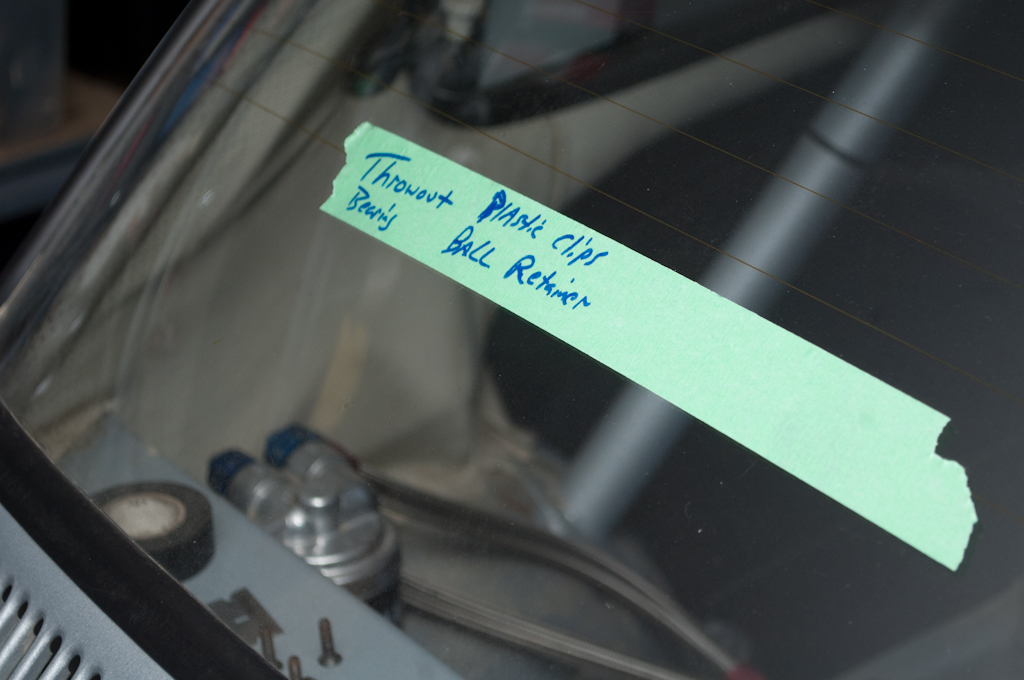 So I finally decided I need to replace the Throwout bearing which was overdue for replacement three years ago. Have you priced one of these things out before? $149 USD! That’s painful. I recalled reading about an alternative option a few years back, but figured I better run the proper bearing for those first few transmission tests. This year, however, I returned to Google to try and search for the solution. I found it on the 356 registry, or did I? Turns out the 356 crowd converts their throwout bearings to the early 911 style because it shifts better and is significantly cheaper then the original option in their cars! Guess I know why I play with VW’s instead of Porsches! Sigh, alright…I’ll order the expensive bearing. 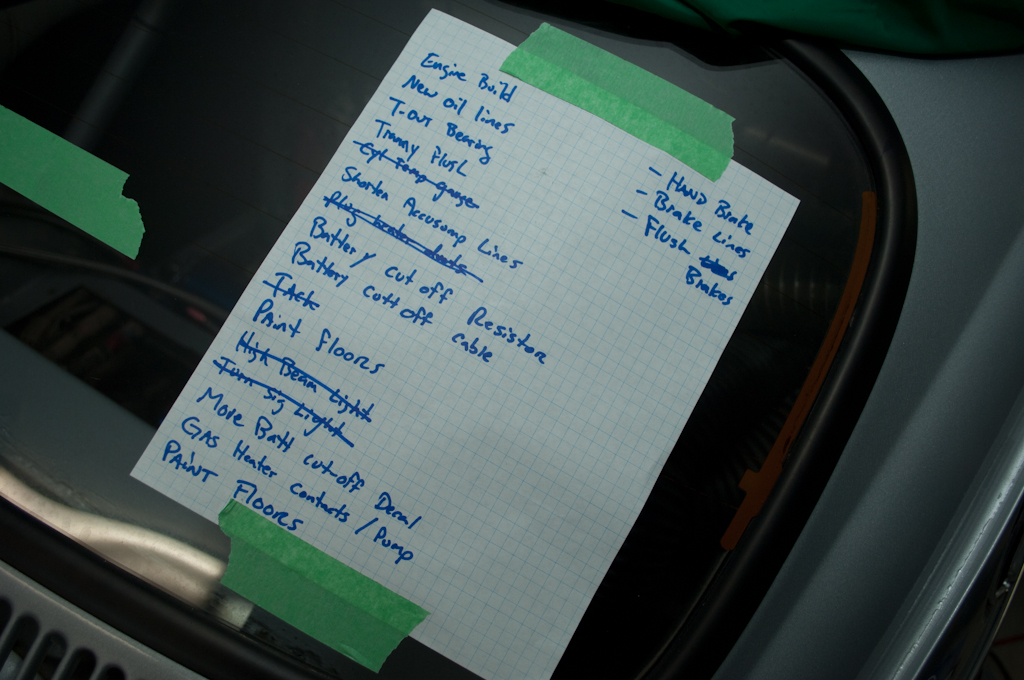 Starting to cross things off on the list, which is good. I have to have the car ready and tested by March 31st, as I could be away for all of April. Our Spring Thaw classic car rally is April 25th, and the car MUST be ready for that! At least I’m starting to cross things off… -Dave
__________________
'71 Type 1 - Rally Project '58 Type 1 - I bought an early!?! '73 Type 1 - Proper Germanlook project '68 Type 1 - Interm German 'look' project '75 Type 1 - Family Heirloom '93 Chevy 3500 pickup - Cummins Swap Last edited by owdlvr; February 21st 2014 at 05:21.
|
|
#495
February 21st 2014, 15:14
|
||||
|
||||
|
Great work, as always!
I use to-do lists too, I find it's strangely fulfilling to cross something off the list... 
__________________
Greetings! ________Gerrelt ________homepage:gerrelt.nl __________________________________
|
 |
| Currently Active Users Viewing This Thread: 1 (0 members and 1 guests) | |
|
|


 Linear Mode

