
|
|
#31
 April 28th 2020, 06:42
|
|||
|
|||
|
Quote:
 Question about the window frames in the doors, did you spray paint them black or did you buy them in black? Or were they already on the car this way? ")
__________________
VW Super Beetle 1303 1973 Kolibri Grün Metallic 
|
|
#32
April 28th 2020, 14:01
|
||||
|
||||
|
Quote:
 The one vent window rubber is cracking, and I should probably yank it out to replace it...but even the west coast metric rubber I used on the rally bug, which isn't stored outdoors, is cracking after 6 years. I'm not convinced replacing it will be all that much better down the road. 
__________________
'71 Type 1 - Rally Project '58 Type 1 - I bought an early!?! '73 Type 1 - Proper Germanlook project '68 Type 1 - Interm German 'look' project '75 Type 1 - Family Heirloom '93 Chevy 3500 pickup - Cummins Swap
|
|
#33
April 28th 2020, 14:24
|
||||
|
||||
|
Quote:
When the engine is running, anytime the engine oil pressure is higher than the air chamber setting, it will fill the Accusump with oil. In this case, with 1.5L of oil, if the engine is running at a pressure higher than 10psi. As the oil pressure builds, so does the oil pressure / air pressure in the accusump. So at full RPM, when the oil pressure gauge on the dash reads 50psi, the oil in the accusump is at 50psi, and the air chamber gauge will match (since you have the oil side of the piston pushing towards the air chamber at 50psi). As the oil pressure in the system lowers, so does the oil pressure in the accusump. But if the oil pump is providing anything over 10psi (in my example) and you will have 1.5L of oil waiting to be used. When you corner the Beetle hard enough to starve the pickup tube, the oil in the accumulator will be used automatically to make up for the loss of pressurized oil from the oil pump.. So essentially, your engine sees no loss in oil pressure as long as the reason for oil starvation is solved before the full 1.5L of oil is used up. Now, keep in mind in my example the pressure has to drop below 10psi...which may not be desirable in a cornering situation. Typically if I'm starving the car for oil in corners, I'm turning a higher rpm and oil pressure than 10psi. So this is why I set my cars for 20-25psi. The trade off, though, is that at idle I have an EXTRA 1.5L of oil sloshing around in the crankcase, which increases the aeration of the oil. Not an issue in the dry sump car, can be an issue in the wet-sump cars. So, for typical street driving on a wet-sump car I set the air chamber at 10-15psi. If I go for a track day, or I know I'm going to be driving spiritedly through the mountains, I'll bump it up to 20-25psi knowing that I'm not likely to spend a lot of time at idle. Before shutting the car off, I rev the motor up to get 40+ psi of oil pressure, and close the manual valve. Now I have 1.5L of oil stored at 40psi, so the next time I go to start the car I can open the valve, pressurize the bearings with oil, and then start the engine. Determining the proper oil level is a bit of a guessing game. I typically start by overfilling the engine by 1/2L, fire it up, open the valve at idle. Close the valve, check the oil level, add another 1/2L and repeat. Once I've got it close, I then warm the car up, do the 40psi shut off and check the oil level, topping up as though the Accusump didn't exist. This diagram shows how the system will be plumbed in the red car. The check valve is important, as it ensures the engine is filled with pressurized oil in a starvation situation, as opposed to wasting oil filling the oil cooler. 
__________________
'71 Type 1 - Rally Project '58 Type 1 - I bought an early!?! '73 Type 1 - Proper Germanlook project '68 Type 1 - Interm German 'look' project '75 Type 1 - Family Heirloom '93 Chevy 3500 pickup - Cummins Swap
|
|
#34
April 29th 2020, 05:48
|
|||
|
|||
|
Quote:
Mine will come apart eventually a lot of sanding before painting i guess
__________________
VW Super Beetle 1303 1973 Kolibri Grün Metallic
|
|
#35
April 30th 2020, 01:17
|
||||
|
||||
|
Hi
There were special edition Beetles in Europe that had blacked window trims and door handles. I used to have blacked out window trims in my old 1302 but I found that would eventually look a bit chipped and faded so on my 1303 I've stuck with polished ones, so much easier to look after. Steve
__________________
STI powered 1303 in the works.
|
|
#37
May 4th 2020, 10:03
|
|||
|
|||
|
Wow. Another great build.
Looks like you were miles ahead by buying one that didn't need all of the finishing work. After recently doing paint/body, It's real hard to not try and get out of ever doing it again.. And, Another vote here for gold wheels..
|
|
#38
May 4th 2020, 20:45
|
||||
|
||||
|
Oil accumulator is plumbed in...it's important to colour coordinate your visible fittings?
 I managed to install the battery and test the electrical system. The initial check found a number of systems or items not working, which was to be anticipated since I repaired what was there and made a lot of new additions without having the ability to test any of it. But it was a good start, there were no sparks and no flames! A few hours in the shop working down the list, and I managed to get everything working properly. The only two circuits I haven't tested are the brake lights and seat heaters. I'd say everything else working is a big win! The wipers gave me a tonne of trouble, as it seems I have a later model wiper assembly in a car that doesn't match the '68, '69 or '70 wiring diagram. But it's all right Joel has enough posts on the interwebs that I was able to figure it out! 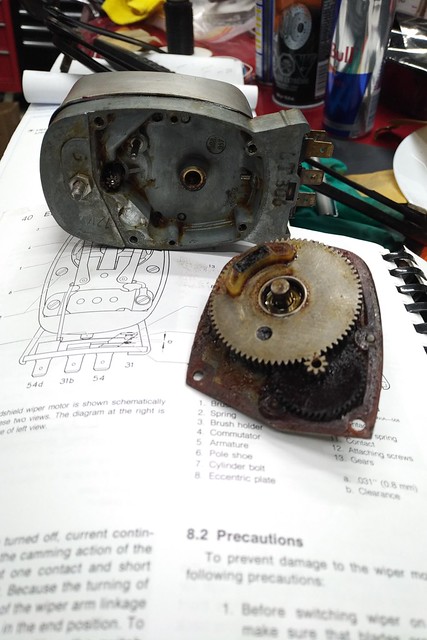 Because the oil pressure warning light has been replaced by a tiny dim LED that is partially blocked by my steering wheel, I've added the "you cannot miss this warning" light. The wideband O2 sensor wiring came in, and now the interior and all carpet has been installed for what I believe is the final time. 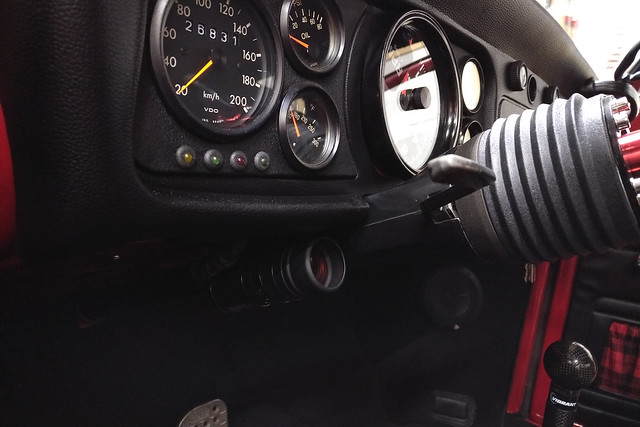 With that, I moved on to solving various problems I hadn't quite figured out yet. One of which was the question of whether I should carry a spare tire or not. In the last 15 years I've had two flats. One was on an Audi, running very questionable tires without date codes, and the other was with a beetle on a gravel road. I haven't experienced a flat on any of our classic car events, and the move to Porsche bolt pattern creates spare-tire problems. The problem, though, is I run these events so if I get a flat, I can't exactly wait around for a tow truck. The organizer has to make it to dinner! I have this Porsche spare, from model unknown, and did measure to see if it would fit. It was darned close, but not close enough. An hour of heat and body hammer, and it now slides into the slot. It's tight. Tight enough to scratch the paint on the car and rim if you're not careful...but it fits!  It had some rust, and covid-19 budget constraints means I'm going to be running the twists longer than I had hoped, so I figured this wheel would be a good one to experiment with paint colours. I want the twists to be darker, but not super dark. So, enter "graphite". Here's what it looks like in gloss with two coats.   And with two light coats of matte clear, so I can get a semi-gloss look. Looks perfect in person, still too glossy in the photo. 
__________________
'71 Type 1 - Rally Project '58 Type 1 - I bought an early!?! '73 Type 1 - Proper Germanlook project '68 Type 1 - Interm German 'look' project '75 Type 1 - Family Heirloom '93 Chevy 3500 pickup - Cummins Swap
|
|
#39
May 5th 2020, 06:05
|
|||
|
|||
|
Quote:
__________________
VW Super Beetle 1303 1973 Kolibri Grün Metallic
|
|
#40
May 11th 2020, 16:42
|
||||
|
||||
|
Well, some aspects of the project are stuck in "waiting on parts" mode, while others are taking a lot longer than anticipated. While waiting for parts, I figured I better tackle the curb-rash on the wheels. Normally I would Powdercoat, but we have reached the limit for the project budget. Rattle-can colour change it is! I used the Dupli-colour wheel paint system, and didn't read the instructions until after the first coat. Normally it's colour base, wait 12-24hrs and then clear coat. Nope! Clear coat 1hr after base OR wait for 48hrs to clear. Well, crap. By the time I had ground, sanded and prepped, it was already late. Oops. Finished the final coat of clear at 3am. Fortunately it has been hot and sunny, which helps bake the finish the day after spraying. I'll wait until the last minute to have tires mounted, in hopes that the paint hardens up enough that the tire shop doesn't completely destroy the work done.
    On Thursday the engine parts finally arrived, after a 28 day delay at the balancing shop. Frustratingly, it seems they balanced the crank from pulley to pressure plate, but may not have touched the pistons or connecting rods(!?!). Pistons with pins were 1.5g off out of the box, but by swapping out piston pins, I was able to get them to zero out...at least to a half gram, which is the best my digital scale can do. I have no way to confirm the rods are balanced outside of total weight, but the set did zero out so...I can hope? Engine internals and heads are all AA Performance, and I used their balance shop in California as I was told it could all be turned around within a week or two. My usual balance shop was closed due to Covid-19, and CB suggested the order (had I gone through them) would about a month. In the end it took 4wks for AA to ship, but I did save roughly $1k over buying a CB setup. Setup has taken me a fair bit longer than I planned. Apparently in my various box of goodies I have a timing gear for the crank that is off by about 1/2 to 2/3rds of a tooth, and carries no timing dots. I didn't really clue into the problem until the crank was assembled and in the case, and I couldn't get the distributor to "sit right" while setting everything to TDC. Had to find a stock gear, make a timing gear puller, and head backwards on the setup. Having a milling machine and the lathe has been a godsend, as I had to pull material off the rocker stands and shorten the studs. I have also forgotten how long it takes to build up a motor from scratch, vs. rebuilding a motor I already have. "Hmmm, why is the pulley tin piece not in the box of tin pieces?", "Why do I keep 4 oil coolers I would never reuse, but don't store the one I would reuse with them?" etc. etc. Not to mention the time to carefully measure, inspect, and confirm everything is fitting right! Didn't get nearly as far as I had hoped this weekend, but I am at least at completed long block stage. I'd have the motor all the way to installing the fanshroud stage, but for the life of me I cannot find a good lower pulley tin piece in my collection. I'll have a new one tomorrow (which has to be modified to clear the oil fittings) and then will hopefully finish up the engine build. At this stage, I'm now pulling out used bits to finish it. For tin I've pulled out some of the powder coated blue tin from my '69 build years ago, and it's getting spray painted semi-gloss black instead of re-powdercoating. The exhaust? I'll be putting on one of the back-up units from the Rally Bug, which has been rallied and beat up. But hey, better to be driving it than waiting around for the world to re-start!  I think I'm going to have to order a second set of pushrods for this motor. The oiling hole I added could definitely be closer to the tip, I was being a little too conservative with where I placed it. As it stands it only clears into the head in the top 20% of the pushrod travel. Drat!   -Dave
__________________
'71 Type 1 - Rally Project '58 Type 1 - I bought an early!?! '73 Type 1 - Proper Germanlook project '68 Type 1 - Interm German 'look' project '75 Type 1 - Family Heirloom '93 Chevy 3500 pickup - Cummins Swap
|
|
#41
May 22nd 2020, 13:23
|
||||
|
||||
|
There has been quite a bit of Netflix time over the last couple of weeks while I wait for packages of parts to arrive. I was mocking up the engine when I realized I've made two significant mistakes in my planning. I hadn't really planned on either a breather setup, or an exhaust setup. Vintage Speed sponsored the Rally Bug build, and years ago we had talked about doing a German Look car, but I didn't exactly get started on it right away! I reached out Mr. Lee, but haven't heard back. During a global pandemic probably isn't the best time to be asking for sponsorship, and it's not like Vintage Speed needs help "getting the name out" like they did when I built the Rally Bug. I hadn't really been thinking about it, but suddenly I am without exhaust and without a breather (and air filters, it turns out). I dug around in my storage shed, and managed to find the "spare" Rally Bug exhaust. It's the first system I had on the car when we put the 2110 into it, but that does mean it's been raced in Rallycross and on some winter events. It's been dented, cracked, and I damaged one of the flanges jumping the car years ago. I figured "hey, it came off a 2110...it's going on a 2110...it'll fit!" Um, no. I had to cut the flange I welded together off, and basically weld up the system from cyl 2 and 4 to the muffler. This one is setup for heater boxes, but I had a set of new J-tubes kicking around. I'm considering the exhaust system to be very temporary...as soon as money starts flowing in again, I'll be buying a new system for the car. A little exhaust wrap, some heat protection, and the bulk of the horrors are hidden. I can polish out the brown that's still visible (it's actually clay baked into the steel) but I just can't be bothered :P
  My original breather plan was to simply use the CB-Style breather. I actually bought the Empi one figuring that the perimeter bolts were an improvement, but once it was out of the package I realized it just isn't useable. The lowest point in the breather is the valve cover lines, which means when you fill the engine with oil it's going down the valve cover line, not necessarily the filler. Not a big deal, but annoying. I also couldn't get past the look of it. Even if I were to paint it black, it's not really what I was going to be happy with. I ordered some of the breather units I used for the Rally Bug, and then quickly realized that the only reason they fit is because I had moved the firewall into the interior by 3". Well, crap. I thought about welding up my own breather, looked at the firewall boxes that other people use, and the way the berg and CSP systems sit. Eventually I realized that this is a problem best solved by spending money, even though it pains me to see the price I paid. I bought a CSP breather, figuring that it solves the problem while meeting the "look" I was hoping for. But my gosh is it overpriced. I spent how much and they can't even throw their special nut/tool in with the breather!?! Ugh. Decided to do some weight reduction. Weber window holes are in, and having found the Rally Bug access holes to be a little too small...I went for full access on this car. I wasn't going to remove the rear apron, remembering how much I enjoyed drilling out 40+ spot welds on the Rally Bug, but then I was looking at it and realized I was really going to hate myself down the road if I didn't. Finally, since it's a German Look car, I figured the only appropriate doors for the Weber windows would be carbon fibre. I'm not sure if these were just a joke for now, or if they will stay long term. If you've ever experienced a carbon splinter, you'll understand why I'm wary of using them long term! 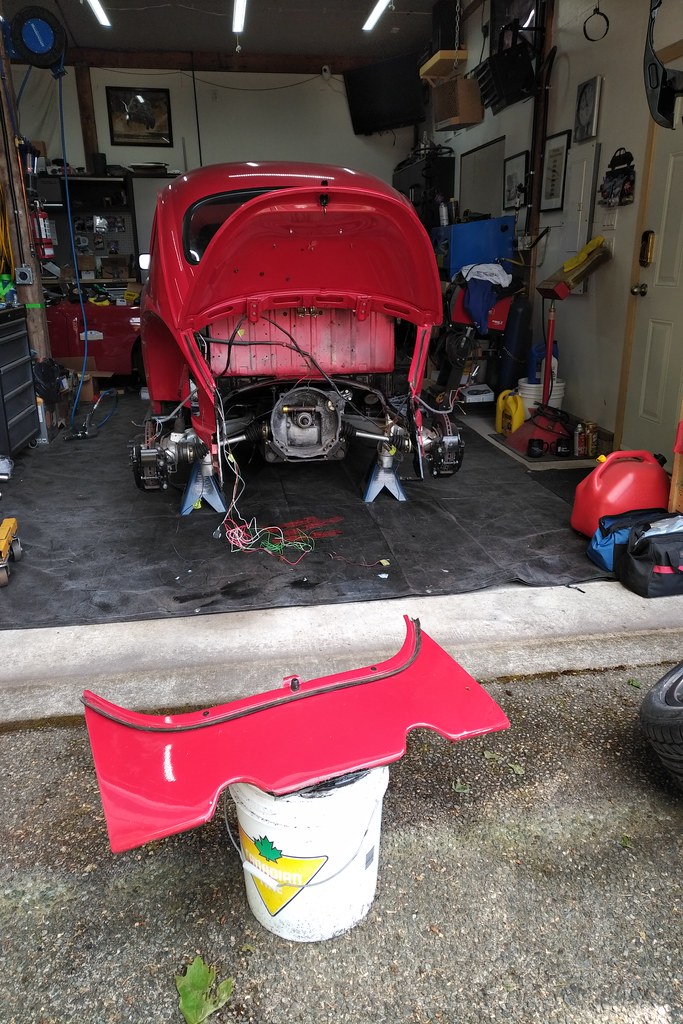   The fuel system has been finalized and all plumbing installed.   My Vibrant Performance oil line fittings finally arrived, almost a month after the hoses, which means I can start on wrapping this project up! There are no excuses now...if I get it done in the next four days it will be exactly two months between trailering the car home and completing it's German Look transition. I have strong feelings I'm not going to make it :P  Started with the breather lines. Looking nice and stealthy in the all-black configuration. I'm second guessing how black the engine bay is going to be, enough that I almost made the breather lines with Stainless Steel braided lines. We'll see how it looks when it's all finished. Still have to make a mount for the breather filter, which I'm going to put up on the firewall (as opposed to feeding dirty air into one of the carbs). I've got a large K&N breather filter with a 1.5" inlet, and will run -10 line to it. But I have to make a mount and adapter from -10 to the filter.  Plugs, jets, and intake mounting access is going to be awesome. Much better than the "almost big enough" windows in the Rally Bug.  Next up was the oil filter mount. I started with the traditional under the fender bracket, but I've never been a fan of putting the oil filter in the path of tire debris. I also really dislike how the filter is visible from the rear of the car. True, you can use a shorter filter...but I'm also adding a temperature sandwich plate for the oil cooler. By the time you stack it up with my filter size of choice (mock-up filter, not the Mahle/Bosch I actually use) it gets pretty darned tall. I was thinking about other options for mounting the filter, and then realized the perfect spot is under the luggage tray. Three holes through the luggage tray, and a metal plate on the otherside to help spread the loads, and I have a filter mount tucked up out of the way. Friends who have seen it are divided 50/50. Some of them think I should be using the rear under the fender mount, and a shorter filter, and the others think this is way smarter. With the factory insulation on the inside of the tray (trimmed, to fit the meal support plate), the carpet goes right over top and there are no bumps! 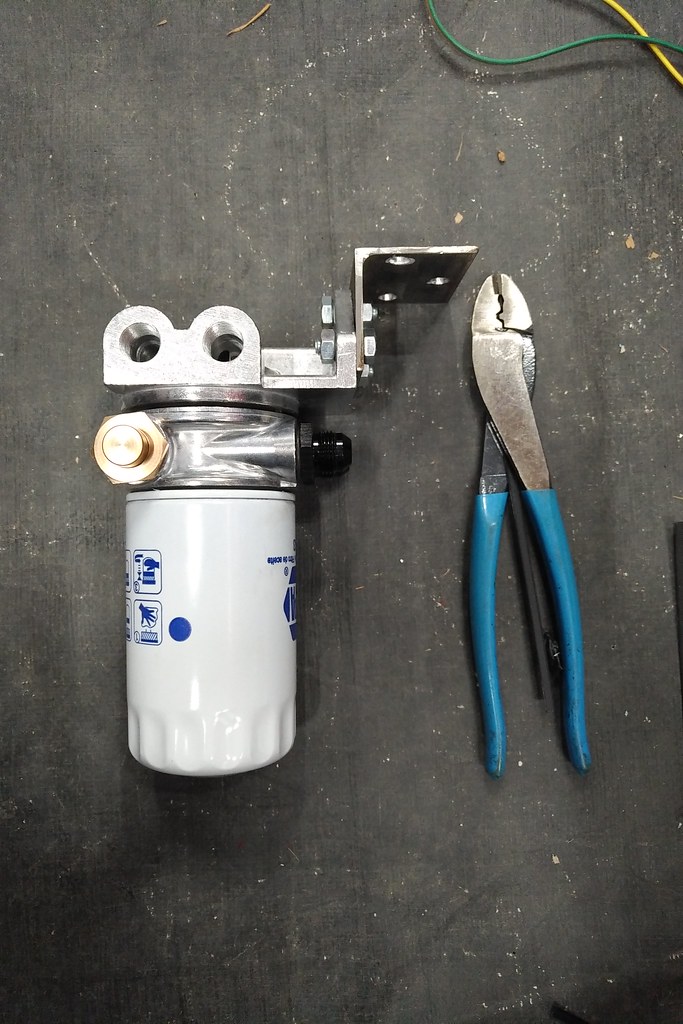  It was getting pretty late last night at this point, about the same time that I realized running the oil lines down the body-to-pan bolts as I originally planned might not be as easy as I thought it was in my head. In fact, it might not work out at all (without machining a whole new set of bolts on the lathe, and making special adapters/line clamps). I've ordered bulkheads to run the lines on the inside of the car, but I'm really hoping to avoid that. The interior is so clean and 'factory', that it would be a shame to run the lines either under, or over, the carpet. Have to spend some time on here to see how other guys have run their lines to get some ideas... 
__________________
'71 Type 1 - Rally Project '58 Type 1 - I bought an early!?! '73 Type 1 - Proper Germanlook project '68 Type 1 - Interm German 'look' project '75 Type 1 - Family Heirloom '93 Chevy 3500 pickup - Cummins Swap
|
|
#44
May 25th 2020, 12:47
|
||||
|
||||
|
Quote:
I added the oiling holes on this motor out 'just in case'. I actually put them a little too far down the pushrod (was being conservative) but have ordered a second set to correct the hole position. As the push rod spins, it sprays a small amount of oil into the rocker area. At best, it's helping to lubricate the area. At worst, it's only removing a very tiny amount of oil out of the regular system.
__________________
'71 Type 1 - Rally Project '58 Type 1 - I bought an early!?! '73 Type 1 - Proper Germanlook project '68 Type 1 - Interm German 'look' project '75 Type 1 - Family Heirloom '93 Chevy 3500 pickup - Cummins Swap
|
|
#45
May 25th 2020, 16:24
|
||||
|
||||
|
Have you done any other mods to ensure oil reaches the valve stems through the rockers? For example,
connect the 2 oil grooves in the cam followers, cut oli grooves in the rocker shaft so oil can reach the valve adjuster screws with higher pressure. Cut oil grooves in the case behind the cam bearings to improve the connection of the oil galley's in the left side of the case with the right side. Drill the oil galley for the cam followers in the right side of the case to connect it to the trust cam bearing oil galley. With this mod you create 2 oil connections from left to right.
|
 |
| Currently Active Users Viewing This Thread: 2 (0 members and 2 guests) | |
|
|


 Linear Mode

